|
|
|
Create a Configuration Group
The first step in creating a configuration file is to create a Configuration Group. A Configuration Group is created automatically if
you use one of the prepared configurations. Otherwise, you can follow
these instructions to create one. A Configuration Group is something
like a directory that you can use to store your configurations. The
Configuration Group should help you manage information effectively.
To create a Configuration Group, follow the five steps below.
- Open a new browser window from this page and click on the
'Experiments' tab. You'll want two browsers open so that
you can read these instructions in one browser and complete
the steps in another browser.
- Make sure that you are still logged in to your EconPort
account on the new browser.
- In the "User Menu" on the left sidebar, click on the
"Configurations" link. After you've clicked on the
Configurations link, you should see a display that looks
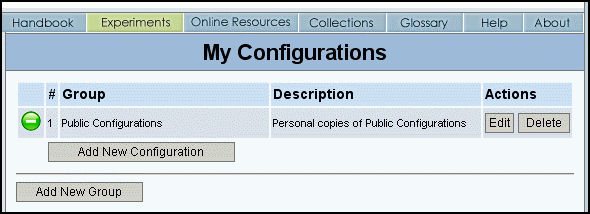
like figure 1. Click on the button labelled "Add New Group".
- Once you click on "Add New Group" you will need to
enter a name for the group and a short description for the
group, and click on the button labelled "Add".
|

Figure 1: Configuration Group editor screen.
|
|
Open the MarketLink Configuration Editor
This paragraph describes a set of six steps that you need to
complete in order to view and work with the MarketLink Configuration
application. Once you've completed these steps, you'll see the
MarketLink Configuration, which is shown in figure 2 below.
- On the same page where you created your Configuration Group,
now click on the button labelled "Add New Configuration".
When you do this, a drop down box appears with several
options.
- Select "MarketLink" from the drop down box.
- Give your Configuration a name, such as 'ICV-DA for "Induced
Cost and Value Double Auction," and provide a short
description.
- To begin configuring your MarketLink experiment, go to the
column labelled "Actions" in the row for the configuration
that you just created and click the "Edit" button. On a
new page, you'll see the name that you gave to your
configuration and your short description.
- Click the button labelled "Parameterize Configuration" to
start the MarketLink Configuration application.
- Before the MarketLink Configuration application
starts, you may see a "File Download" dialog box.
- If the dialog box does appear, click "Open".
- The MarketLink Configuration editor should now be open.
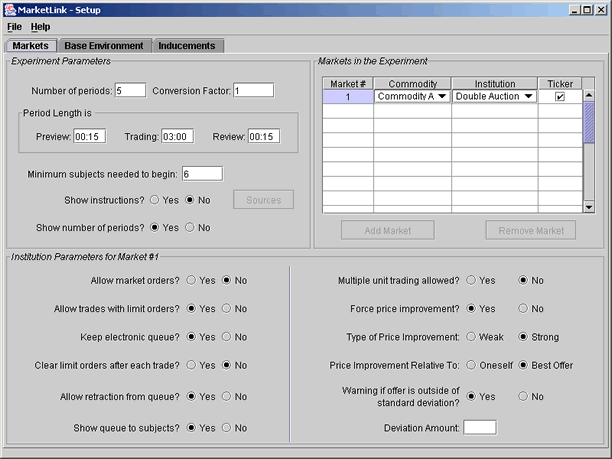
The editor looks like figure 2 below.
|

Figure 2: Initial MarketLink Configuration editor screen.
|
|
Edit a MarketLink Configuration
Once the configuration editor is opened, you can see (either in figure 2
or in the MarketLink Configuration application if you have it open) that
the "MarketLink - Setup" page has three tabs, which are labelled Markets,
Base Environments, and Inducements. Each of these three tabs are
explained briefly here and in more detail on separate pages for each
tab.
- Markets
The Markets tab is used to edit the settings for the market
mechanism, such as the length of the trading period, the
number of trading periods, whether the asks by sellers and
the bids by buyers are queued, and so forth. For additional
information on the markets tab, click
here.
- Base Environment
The Base Environment tab is used to determine basic settings
for the economy that will be represented in the experiment,
such as the number of buyers, sellers, and traders, the
number of commodities, the amount of currency, and the
number of units of each commodity that the agent begins
with in each trading period.
- Inducements
The MarketLink applications currently supports market
experiments for a commodity market (in which each buyer has
a list of unit values and each seller has a list of unit
costs), and an asset market (in which traders have a
dividend schedule for an asset). The 'Inducements' tab is
used to edit these values, costs, or dividends.
|
|
Save your MarketLink Configuration
The configuration that you have opened is currently set up to run
a commodity double auction experiment session. This configuration
is ready to use once it is saved to your Configuration Group on
EconPort. You can save it by going to the top left corner of the
configuration editor application and going to File -> Save. This
will save your configuration to the Configuration menu on the
"My Configurations" page.
When you save a prepared configuration, you'll see a check box
labelled "Create experiment." If checked, a default configuration
group will be automatically created (if you don't already have one)
and the experiment will be included in the default experiment
group. If you choose to create an experiment group manually,
there are two steps that you need to complete: (1) create an
experiment group and (2) create an experiment session.
|
|
Create an Experiment Group
An Experiment Group is created on the same page where you created
your Configuration group. Follow the six steps below to create an
Experiment Group.
- If you don't currently have the page with "My Configurations"
and "My Experiments" open in a second browser, open another
browser and click
here.
- Click on the "Add Experiment Group" button.
- At this point you'll see a text box with your e-mail address
in it, and a smaller text box to the right of your e-mail
address.
- Enter a short code into the smaller text box.
When your students come to EconPort to participate in an
experiment, they will enter your e-mail address followed
by the access code that you enter here. For example, if
your e-mail is 'your_name@your_school.edu' and you enter
the access code 'da' then students will access your
experiment on EconPort by entering the access code
'your_name@your_school.edu-da'.
- Enter a name for the experiment and a short
description.
- Click 'Add' to create the experiment group.
|
|
Create your Experiment Session
Your Experiment Session will be ready after you complete the five
steps below.
- In the experiment group that you've created, click on "Add
Experiment".
- A drop-down menu with the label "Select a parameter set"
appears.
- Scroll down this drop down menu and select the parameter
file that you created earlier.
- Enter an experiment name and short description, and click
"Add".
- You've now completed the setup for your experiment.
|
|
Click here to return to the main configuration page.
|
| |